Woodworker's Journal 2004 Spring, страница 63
Slide Profile Template Slide Profile Template
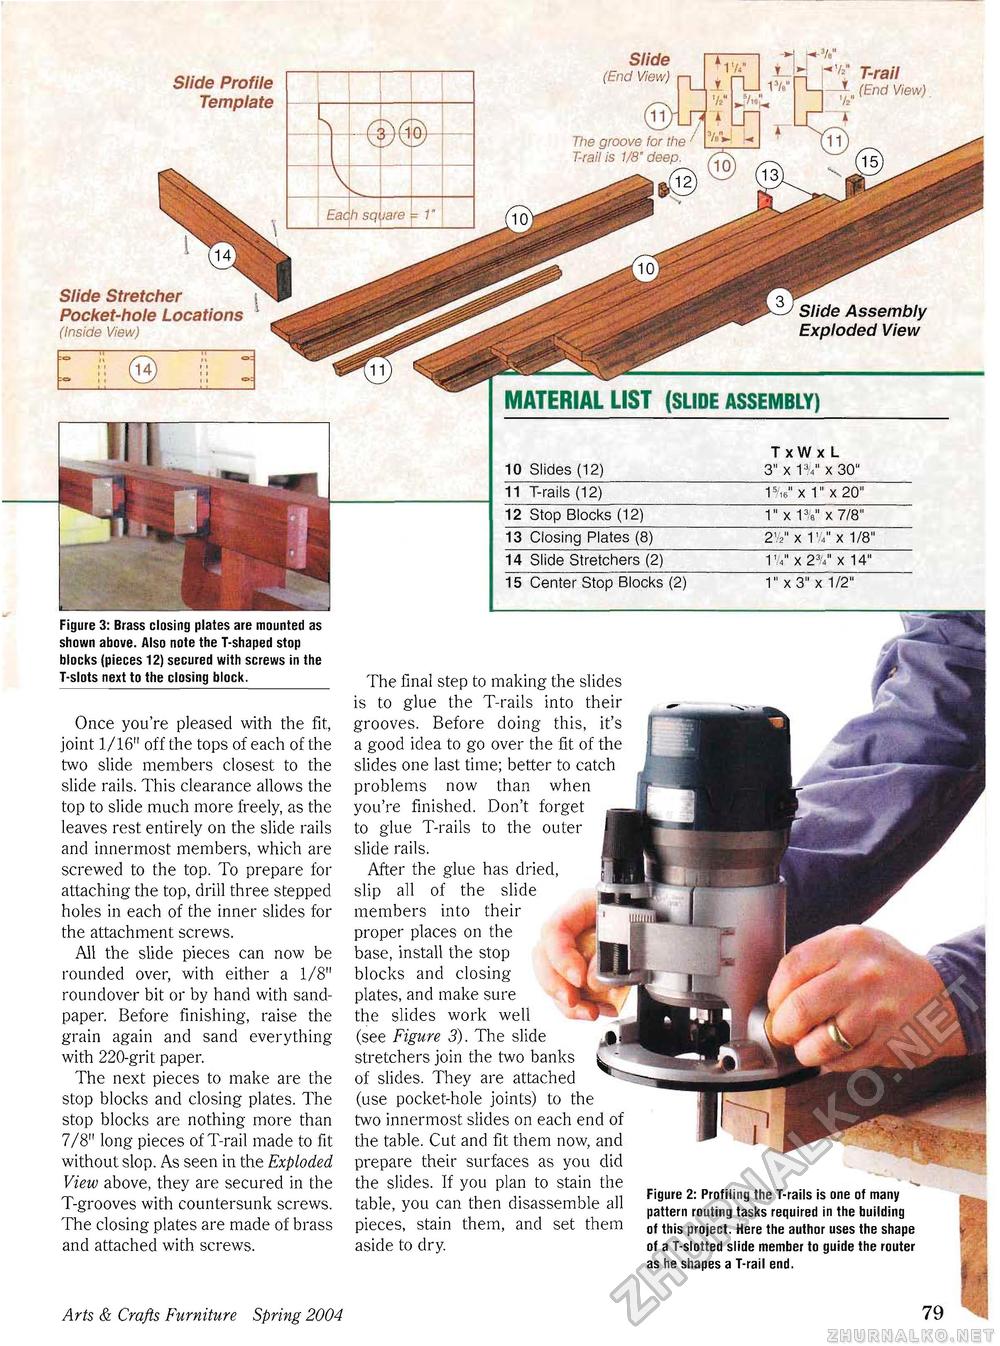
Slide (End View) W rvI T-rail (End View) Slide Stretcher Pocket-hole Locations * (inside View) Slide Assembly Exploded View Figure 3: Brass closing plates are mounted as shown above. Also note the T-shaped stop blocks (pieces 12) secured with screws in the T-slots next to the closing block. Once you're pleased with the fit, joint 1/16" off the tops of each of the two slide members closest to the slide rails. This clearance allows the top to slide much more freely, as the leaves rest entirely on the slide rails and innermost members, which are screwed to the top. To prepare for attaching the top, drill three stepped holes in each of the inner slides for the attachment screws. All the slide pieces can now be rounded over, with either a 1/8" roundover bit or by hand with sandpaper. Before finishing, raise the grain again and sand everything with 220-grit paper. The next pieces to make are the stop blocks and closing plates. The stop blocks are nothing more than 7/8" long pieces of T-rail made to fit without slop. As seen in the Exploded View above, they are secured in the T-grooves with countersunk screws. The closing plates are made of brass and attached with screws. MATERIAL LIST (SLIDE ASSEMBLY)
15 Center Stop Blocks (2) 1" x 3" x 1/2" 15 Center Stop Blocks (2) 1" x 3" x 1/2" The final step to making the slides is to glue the T-rails into their grooves. Before doing this, it's a good idea to go over the fit of the slides one last time; better to catch problems now than when you're finished. Don't forget to glue T-rails to the outer slide rails. After the glue has dried, slip all of the slide members into their proper places on the base, install the stop blocks and closing plates, and make sure the slides work well (see Figure 3). The slide stretchers join the two banks of slides. They are attached (use pocket-hole joints) to the two innermost slides on each end of the table. Cut and fit them now, and prepare their surfaces as you did the slides. If you plan to stain the table, you can then disassemble all pieces, stain them, and set them aside to dry. Figure 2: Profiling the T-rails is one of many pattern routing tasks required in the building of this project. Here the author uses the shape of a T-slotted slide member to guide the router as he shapes a T-rail end. ft Arts & Crafts Furniture Spring 2004 17 |
||||||||||||||||||||||||||||||||||||||||


